Proper exposure
is determined from 3 components:
 |
ISO Speed |
How sensitive
the sensor is to light |
 |
Aperture (Lens Opening) |
The amount
of light that
reaches the sensor |
 |
Shutter Speed |
How long
light reaches sensor |
Each sequential shutter speed allows either twice or 1/2 the light to
reach the sensor:
| going from 1 second to 1/2 allows 1/2 as much light reach the sensor |
| going from 1/250 to 1/500 allows 1/2 as much light reach the sensor |
| going from 1/30 to 1/15 allows TWICE as much light reach the sensor |
| going from 1/125 to 1/60 allows TWICE as much light reach the sensor |
Each sequential aperture also allows either twice or 1/2 the light to
reach the sensor:
| going from f4 to f5.6 allows 1/2 as much light reach the
sensor |
| going from f5.6 to f8 allows 1/2 as much light reach the
sensor |
| going from f8 to f5.6 allows TWICE as much light reach the
sensor |
| going from f5.6 to f4 allows TWICE as much light reach the
sensor |
As you can see, there is a direct relationship between shutter speeds
and f-stops. Let's say you set your aperture and shutter as
follows:
|
Original Exposure |
If you were to change the aperture to f11,
you would cut the light reaching the sensor in half. |
1/2 as much light as the original exposure
|
If you adjust your shutter speed to allow TWICE as much light (from
1/60 to 1/30), both the final exposure and the original exposure will both allow
the exact same amount of light to reach the sensor. |
Final Exposure
(same amount of light reaches the sensor as in first exposure)
|
|
|
| Aperture |
Shutter |
| f11 |
1/60 |
|
| Aperture |
Shutter |
| f11 |
1/30 |
|
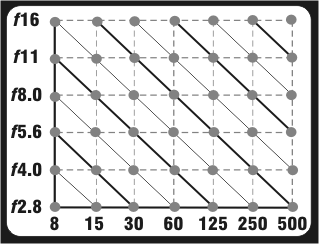
This charThis chart shows this linear relationship:

Find any point where there's a circle and you find an exposure
combination of shutter and aperture. Follow the diagonal line and
you can find equivalent exposures. For example, find the dot at F4
and 1/60. If you follow that diagonal line, you'll see that the
other dots on that line indicate equivalent exposures:
| Shutter: |
1/125 |
1/60 |
1/30 |
1/15 |
1/8 |
| Aperture: |
f2.8 |
f4 |
f5.6 |
f8 |
f11 |
So, as you can see, there is a direct relationship between each shutter
speed and each f-stop on the lens aperture.
Why are there so many equivalent exposures?
The reason that there are many equivalent exposures is to allow
you to decide which is more important to you: the shutter speed or
the aperture. As indicated in previous sections, your choice of
shutter speed or aperture affects the outcome of your picture.
Although each equivalent exposure will allow the same amount of light to
reach the sensor, taking a picture at 1/8 of a second at f11 will have very
different results than taking an equivalent exposure of 1/125 at f2.8.
|
2 - Equivalent Exposures - with very different
results |
| 1/8 second at f11 |
Camera must be tripod mounted otherwise you won't be
able to hold the camera still for this long. Also, at f11, you
will have a fair amount of depth of field in the picture. Good
for landscapes, not so good for portraits. |
| 1/125 second at f2.8 |
Camera can be hand-held (with lenses of a focal
length less than 125mm). At f2.8 there is very little depth of
field. This would be ok for a portrait, but terrible for a
landscape. |
My camera meter knows all (NOT!)
Your camera probably has a meter in it. You use the meter
in your camera to help determine how to expose each picture you take.
But, how accurate is it?? Like anything mechanical, it is calibrated
for certain conditions. If your picture isn't exactly like the
conditions it's calibrated for, your picture will not be exposed properly.
Here's how it was calibrated:
|
Photographic light meters are calibrated to
"think" that everything they see is a medium gray in color - 18%
gray to be exact. |
Using a light meter to calculate your exposure will cause everything to
come out a medium gray (or the equivalent tone in color). This works
when you're taking pictures of objects that are medium toned. But
what if you take a picture of snow. Your meter will think that the
snow is medium gray and "think" that there's a lot more light on the snow
than there really is because the white snow reflects much more light to
the meter than a medium gray object would. So the camera is FOOLED
into thinking there is more light than there really is and tells your
camera to take a picture with the wrong exposure. The result:
the snow is medium gray in the resulting picture!
Photographic light meters are only right SOME of the time! That's
why you have to understand its limitations. The Zone system was
devised by Ansel Adams for black and white photography but can be adapted
for color photography and is a way of simply compensating for this
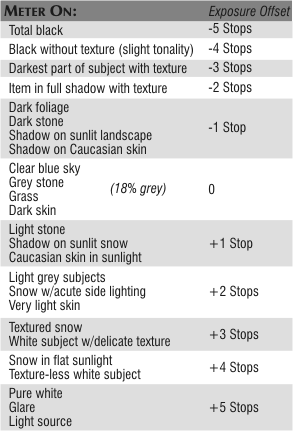
limitation. The following chart can help you determine the correct
exposure when using a "spot" meter:
 |
For example, if your subject is dark foliage, walk right up to
the foliage and take a meter reading from it (or use a "spot" meter). If your camera
meter indicates an exposure of 1/60 at f11
according to this chart, your exposure should be -1 stop.
You could open your aperture one stop or set your shutter to
one-stop more light. So either of the following would work:
1/60 at f8
or
1/30 at f11
Set your exposure manually to one of these settings or use the
Exposure Compensation setting on your camera,
step back, recompose and take your picture. |
An alternative way to using this chart is to find an
object in the picture that has the same amount of light that your subject
does and is a medium gray in color. Take a meter reading from that
object and set that manually. You can purchase "18% Gray cards" at
your local camera store that are made for helping determine the correct
exposure.
How to FOOL your light meter...
You can easily fool your light meter. When taking a
picture of a back-lit subject, your meter sees the back lighting as well
as your subject. If your subject is back-lit, it means their face is
in shadow and is considerably darker than the background. But your
camera meter may not know this! If you don't compensate, you may get
a silhouette. Other conditions that WILL fool your light meter are
when a good portion of your picture is especially dark or light.
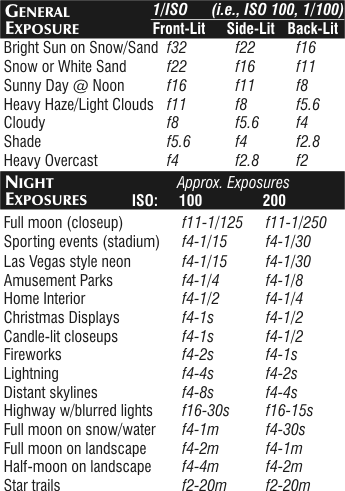
The Sunny-16 Rule
The Sunny-16 rule is a simple guideline for determining
exposure. If you are taking a picture on a sunny day between 2 hrs
after sunrise and 2 hrs before sunset, the proper exposure for a front-lit
medium gray object will be f16 at 1/ISO. For example, using an ISO speed of 100, the
proper exposure on a sunny day would be f16 at 1/100, or
f11 at 1/200 or f22 at 1/50, etc.
When in doubt, bracket...
When you "bracket" your exposures you take more than one
picture of a scene. Each picture is at a different exposure.
You would do this when you're not sure of what the correct exposure should
be. For example, if you think the exposure should be:
1/125 at f11
you could take 3 pictures as follows:
1/60 at f11
1/125 at f11
1/250 at f11
You would end up with 3 pictures - one overexposed 1
f-stop, one normal and one underexposed 1 f-stop. Hopefully one of
these would come out correctly. Of course in the above example I changed
the shutter speeds, but could have equally have changed the lens opening
to achieve the same bracketing result:
1/125 at f8
1/125 at f11
1/125 at f16
| Sample Exposures |
 |
Not so technically speaking...
Exposure is a not an exact science. The "proper" exposure
isn't a scientific fact - photography is an art - and the "best" exposure
is subjective. The viewer decides what's right and what's not.
Sometimes a scene looks better when it's slightly underexposed.
Underexposure tends to saturate some colors and may eliminate details in
objects that may detract from your subject. Sometimes a slightly
overexposed picture may look better. You decide (more on this later)
- you're the photographer! Bracketing is sometimes a good idea even when you
think you know what the exposure should be. When you view your images
on a computer, you can decide which one you like best.
Exposure Modes
Automatic cameras often have several exposure modes: Program
mode, Aperture Priority, Shutter priority and Manual.
If you use your camera in PROGRAM mode your camera determines
both your aperture and shutter - this is for when you just want to take
pictures without thinking about things like depth of field or shutter
speeds. But be aware that your camera meter CAN and WILL be fooled.
When you use your camera in any "Program" mode, you lose control.
Aperture Priority means that YOU select the lens aperture and the
camera's internal meter determines what shutter speed to use for proper exposure. You want this mode when you want to control the
aperture to achieve a certain depth of field result.
Shutter Priority means that YOU select the Shutter speed and the
camera's internal meter determines what aperture to use for proper exposure. You lose control over your aperture this way and
can't control your depth of field - this is good when you care more about
your shutter.
In MANUAL mode you gain full control by setting both your
aperture and shutter. You'll need a light meter - either one in your
camera or a hand-held meter to determine what your shutter and aperture
should be set at.
|