| Sunrises and sunsets are the two hardest things
to photograph. Look at the scene to the right. When I
took this picture at dawn, I could easily see both the reflection
in the water as well as the clouds in the sky. But I knew
that the camera couldn't. The contrast between the sky and the
water was far too much to be recorded. I could
have chosen to expose for the sky, but the water would have come
out black - underexposed. I could have exposed for the
water, but then the sky would have been all washed out -
overexposed. What I did instead was FOOL the camera so that
BOTH the sky and water came out with detail. Here's how...
The Graduated Neutral Density Filter
This filter is clear on one half and has gradual
shading on the other half. It works best when photographing
landscapes with bright skies or sunrises or sunsets. The
idea is that you place the dark half of the filter on the bright
part of the scene - typically the sky. That helps reduce the
contrast ratio in the picture. By darkening the sky, your
exposure can now capture detail in BOTH dark and light areas
because you've equalized the contrast. This is an invaluable
filter when taking landscape pictures.
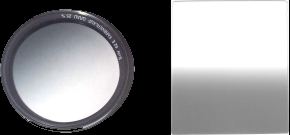
There are two styles of this filter - circular and
rectangular (as above). The circular is relatively useless
because it can't be maneuvered up or down in front of the lens, thus the dark area
always starts in the middle of the frame (remember the "rule of thirds"?).
The "rectangular" version fits into a Cokin holder and looks
like this when mounted on a lens:

As you can see, it slides along a groove so that
the separation between the dark and light portions of the filter
can be moved within the scene. While looking thru the
viewfinder, you can see the effect the filter has on the scene and
can slide to to just the right place (you can't do that with the
circular type).
|