|
|
White Balance
The color of light can vary
dramatically and is measured with a scale called "degrees Kelvin". The "Kelvin"
scale starts at "absolute zero" (0° kelvin =−273.15°
Celsius or -459.67° Fahrenheit). The sensor in your
camera has to know what the color of the ambient light is in order to adjust
each image so that the colors look correct. Mid-day sun has a color
temperature of 5,500°
Kelvin. The light at dusk and/or dawn has a color temperature much warmer than
that - about 3,500°
Kelvin. In cloudy weather, the color temperature is a cool 6,500°
Kelvin. Since the color temperature can vary so dramatically, we have make an
adjustment in our digital cameras so that they know how to adjust the colors in
our images. This is done with the "White Balance" adjustment.
When shooting JPEG images, the images are PERMANENTLY adjusted to the white
balance that either the camera or you select. When shooting RAW images, you can
change the white balance when editing the image on a computer.
Auto White Balance vs Manually set White Balance
Every camera has an "AUTO" White Balance setting and
almost all cameras also have a manual white balance setting. The auto setting
tries to figure out the color of the light and adjust the resulting image
accordingly. But, it's not always accurate. You are ALWAYS better off to
tell your camera what the color of the light is BEFORE you take the picture.
The only downside of this is that you have to remember to reset the white
balance before taking another picture with different light.
Adding/Coloring light
You can add light to help change the color of the
light. This is most
commonly done using electronic flash. A very good way to add light
using electronic flash is "fill-in" flash so that you are not providing
ALL of the light, but are using some of the ambient light available.
You can even "color" the light of the electronic flash by using colored
filters over the flash.
Modify the Light with filters - Film only
You can easily modify the light so that
the film "thinks" it's seeing 5,500° Kelvin light (what film expects to
see). This is commonly done
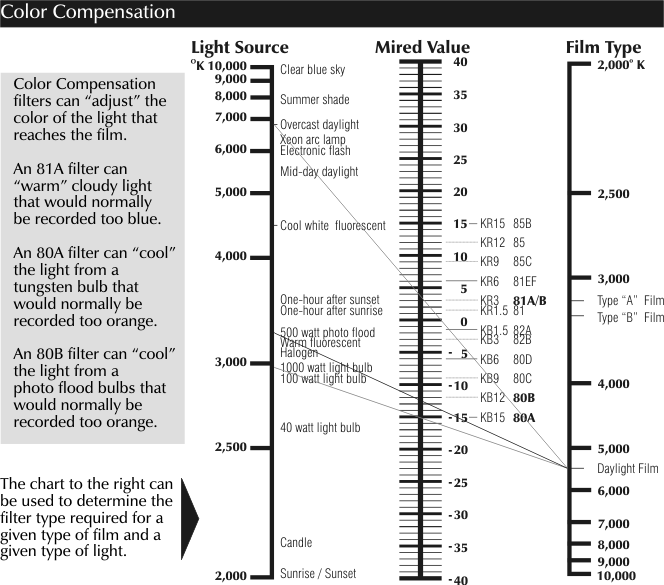
with filters. This isn't something you want to do with digital photography. The following chart shows the relationships between
different types of film (on the right), different kinds of light sources
(° Kelvin) and different filters (in the center). For example,
when shooing with daylight film and using a 3,000 ° Kelvin light source,
you would want to use a 80A filter - where the line drawn from the film
type to the light type intersects the Mired value. (Note: MIRED is an
acronym and is related to color temperature).
Modify the Light - using Digital
Digital cameras don't need color
compensating filters. They have a feature called "White Balance".
The white balance refers to the compensation that can take place in the
digital camera to "correct" the color of the light. Most digital
cameras have options such as: Automatic White Balance, Daylight,
Tungsten, Fluorescent, Cloudy, Flash, Preset, etc. When set to
"Automatic" - usually the default for a digital camera - the camera
tries to make an intelligent decision as to what color the light is.
But it usually only works within a small range of light (i.e., 3,500° -
7,000°) and doesn't always work that well. If shooting on a cloudy
day, you're always better off to select "cloudy" than "automatic".
Just don't forget to set it back! The best option is to use the
PRESET option if your camera has it. This allows you to "measure"
the color of the light using a white or neutral gray object. This
way you're always assured of the best color compensation.
Even when taking RAW images you
need to properly adjust white balance! Here are 4 images all taken
with tungsten light - the first three are RAW and the last is a JPG.
1. The first image was taken as RAW
and AUTOMATIC white balance.
2. The second image was taken as RAW and TUNGSTEN white balance.
3. The third image was taken as RAW and a measured PRESET white balance
was used.
4. The fourth image was taken as a JPG and a measured PRESET white
balance was used.
|
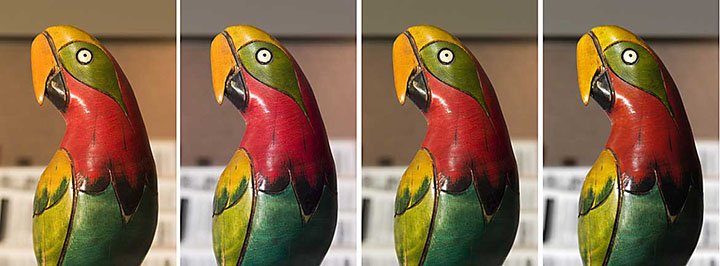
The last three images have the best
white balance. The "Automatic" white balance (first image) is the
worst (look at the background!) - the reason for this is the automatic setting can't compensate
enough for tungsten light. The last two are the best (although you
wouldn't know what the real colors are, these are the most realistic).
You can especially see a difference in the background colors. The lower
background was black text on white paper.
The first three images were RAW
images and could have been easily modified to correct for the incorrect
white balance, but... EVERY correction you make in an image reduces its
quality. Shoot an accurate white balance up front and you get a
better image and save yourself time on the computer!
|
|